Jumat, 05 Mei 2017

yoast wordpress seo

yoast wordpress seo
yoast wordpress seo

hey there and thanks for watching wpbeginner.today you'll learn how to install and setup wordpress seo plugin by yoast. aside from great content on your site, youneed to make sure it's properly setup and optimized for search engines. the most comprehensive plugin to handle thisis wordpress seo plugin by yoast. please note that these steps are what wpbeginnerrecommends and other experts might have their own preferences. if you are moving from another seo pluginor theme framwork like genesis, thesis, or headway then you want to install the seo datatransporter to move all your seo data over

before deactivating it. if you have a brand new site, you can skipthat step. after installing and activating the plugin,you'll see this seo link in the admin area, we can go to seo-->dashboard to get started. under general settings they have an introduction tour that you canfollow to get an overview of the plugin. and here you can reset to default with oneclick if you need to start over with the setup. next we have tracking, if you want to send anonymousinfo to them you can check this, we have it unchecked. under security, you can disable the advancedpart of the wordpress seo meta box.

checking it keeps other authors from makingredirects and noindex items on your site. under webmaster toolsthis area lets you add your site to your webmaster tools to some search engines. just add themeta code for each here and click save settings. if you site is already in your tools area,you can ignore this section. next is the titles and meta, for title settings, keep this uncheck as wordpressseo has auto-detected whether is needs to rewrite titles for your pages. sitewide meta settings click use meta keywordstag. under clean up the head check hide shortlinksfor posts and click save changes.

the home tab is where you fill out your titletemplate or what shows at the top tab of your home page.add the meta description about your site here and the meta keywords. the keywords are whatyour site is mainly about and then click save changes. post types lets you choose the default titletemplate that all posts and pages will show, the default meta description and keywords. we recommend you use the wordpress seo metabox on each post and page to manually fill this information out individually and i'llshow you what that looks like in a minute. for these, we can just use title for the templateand that will bring in the post or page title into the url. we'll click save changes here.

next is the taxonomies area you can addthe title template for these as well and as for descriptions, the plugin picks up thedescriptions from categories and tags. we'll leave all default settings and clicksave changes. other are for special pages like author archives,date archives, search and 404. we recommend disabling the author archiveif you are a one blogger site. we'll leave everything else the same and clicksave changes. next area we'll cover is social.with this we can add facebook information. here you add a facebook admin so you can bringthe insights into the dashboard. if you have a facebook page, add the url aswell as the image url and description.

to make it easier, you can also copy home meta. down here is the image url that will be usedif there is no image in the post or page. when you're done click save changes. next is twitter, we can check this to add twitter card meta.this is great if someone retweets your links people can see a summary of your post likethis and you can choose to just show the summary or show the summary with an image. once we add that info, we'll click save changes. for google+ click add google post meta dataand add the url for the google page for your business. you'll also need to go intogoogle settings and add your site's url

in your about section. we'll save changes here. next we want to setup xml sitemaps. this isthe fastest and easiest way to get your site indexed and to notify search engines aboutyour new content. make sure you check this box. for single author sites, check this to disableauthor/user sitemap. the plugin automatically pings google andbing, but you can enable it to ping yahoo and ask.com as well. you can exclude post types from being addedto your sitemap like media attachments. here you can reduce the number of entriesper sitemap page if you run into memory issues.

next are permalinks. this area builds on thepermalink structure. it assumes, you've gone into the settings-->permalinks and changedit from the default link like this to something like this. here you can remove the /category/ from theurl. next is enforce trailing slash, if you endyour posts with .html then you probably want to enforce the trailing slash. next is to remove stop words from the permalink.they are common words like a, an, the and yoast believes you create cleaner urls by doingthis. we leave this unchecked as we disagree with that. the redirect attachment url to parent post allimages have their own url, if you don't want

users to go to these image urls, then checkthis to redirect to the parent post. the next item is good if you have a lot ofcomments on your site as it disables the threaded replies from working for users who have javascriptdisabled, which is the case with most web crawlers. for canonical settings, just leave as defaultand click save changes. next we have internal links. this is the breadcrumpsand trail to the page you are on and is used by the search engines like this: you have domain,blog, tutorials and this is where this article is found. to get this, click enable breadcrumbs,choose a separator, here is the anchor text for the homepage, prefix for the breadcrumbpath. this is prefix for archives and for searchand for the 404 page.

and here you can choose to bold the last pageof the breadcrump. you can also choose to show the taxonomy for thebreadcrumbs. we'll leave none. we'll save changes. the rss feeds section adds content to allyour posts in a feed before and after the post so when a content scraper copies yourcontent, there will be a link back to your site, letting search engines and readers knowwhere the original source is. we'll leave the info here and click save changes. next is import/export. if you used anotherseo plugin, this is where you can import those settings. since we've spent a good amount of time settingall this up, you can also export all the settings

as a backup for other sites or for safe keepingif you mess these settings up. next is bulk title editor. this lets you quicklygo into each post that you had on the site before installing the plugin and update thetitles to a better seo title. once you're finished with them, you can click save all. same thing with the bulk description editor.this lets you give a better description of what each post is about for better seo. the edit files allows you to create a robots.txtfile if you don't have one and it lets you edit your .htaccess file. as a beginner leavethe defaults for your site. extensions are paid upgrades to take yoursite to the next level for seo.

now you want to make sure you are customizingeach post and page as you write them. this really maximizes the benefit of having theplugin installed. for example, i'm creating a new post. you'llsee this new box on every post and page. fill this out on ever post and be as detailed aboutit as you can. give it a focus keyword, seo title, meta description,meta keywords. this is your focus keyword in the article headding page title, page url, content, meta description.try to make all these yes. then look at the page analysis and see ifyou can get all these reds and yellows to green. we'll leave advanced alone for now.

with social you can just keep what the defaultwas from the settings. and when you go to publish you'll also see thisseo area...it will give you a quick red light green light if your seo is good or bad forthe site before you publish. try to get green for every post...in your post writing workflow,make this one of your last things you do after you write your articles to increase your searchengine optimization. i hope you liked this video and found it helpful. if you did, click on the like button below and leave us a comment. and if you want to receive more helpful videos don't forget to subscribe to our channel and check out wpbeginner for more useful information on wordpress.

yoast wordpress seo New Zea – WordPress Theme to Display Your Photos

yoast seo

yoast seo
yoast seo

when you go to the xml sitemaps tab of yoast seo you will see this checkbox, on the top here. normally, this is enabled, so you will already see the tabs below it, but if it's disabled, you know that by enabling it you will see all the tabs. on the first tab of the xml sitemaps settings, you can do only one thing. you can change how many entries there are in an individual sitemap. you have to know that the yoast seo plugin divides your sitemap

into several sitemaps if you have multiple posts. it will also create a separate sitemap for each post type and for each taxonomy that is included in your index sitemap. it does this for two reasons. one, to make it faster and two because it allows you in google search console to see the crawl errors, based on the different sitemaps so you know that when there are errors what page type you should be looking at for those errors.

now by default it uses only a thousand posts in each sitemap. so if you have 5,000 posts for instance, it would divide it into five separate sitemaps. if it's too slow on your site, taking this down will actually speed up the generation of the xml sitemap. it also means though that you'll have a few more xml sitemaps. clicking on this button here will take you to your xml site.

if this doesn't work and clicking on the xml sitemap button doesn't take you to your xml sitemap, then there are a few things you can do. first of all, make sure to save your changes here, as otherwise it might not have rendered. second, if it doesn't work, go to settings, permalinks and hit save there without changing anything. usually, that will make it work.

yoast seo Transfer File Server to Server with FTP Program. You Don’t Need to Download First

yoast seo title

yoast seo title
yoast seo title

the next settings tab of the titles and meta section of yoast seo is the homepage tab. this tab actually has different looks depending on your settings. what you see here is what you would see on a default site where the homepage of your site is the homepage showing all the recent

blog posts. if you have a seperate static from page set like so, in your wordpress settings, then this would either look like this or if you have a blog page set as well, it would look like this. in these case, you can't do much here you can just go to the specific

pages that you need to edit to change the titles and meta descriptions etc. in the case that you have a normal wordpress site with the posts on the frontpage, this is where you set the title and meta description for that homepage. now it is a template, because it's paginated. so this title template is--consists of a lot of different

template tags. these template tags are all explained in detail in the help tab. there are basic variables that you can use, and some more advanced ones. now we're not going to go through all of them, but most of them, as most of them speak for themselves rather easily but the most important ones you'll see

are used quite often. the most important ones are sitename, which is the name of your site, sep, which is the seperator that we selected on the previous tab, page, which translates into page 1 of more, if you have multiple pages, so if the current page is paginated. in all our default templates, you'll see that page is always

there, and you should never remove it, because almost any page type in wordpress can be paginated. and if you don't have the page --page variable in there, then at that point the title for page 1, page 2, page 3 is all the same if you have this in there, the title will actually differ, and people will know from the title tag, on which page they are.

now we also use sitedesc here, which is the site's tagline or description. and as you can see in the list above here, there are lots and lots of different types of variables that you can use. we'll go into more details when--on them once we get to the post types. for now, it's probably best to set it to something like this, or

to a shorter tagline. if your site description is too long, you can just type text here as well. you can do basically whatever you want. this is what your homepage title will look like and this is what your homepage meta description will look like.

yoast seo title

yoast seo review

yoast seo review
yoast seo review

the yoast seo for wordpress training contains everything you need to know about the plugin. we cover every single little feature the plugin has. we'll show you how to use it, what it's for, and why it's there. we'll also update this training every time we update the plugin. so that you know all the new things that are there and the things that we've changed. we'll give you a badge to certify that you're a yoast wordpress seo plugin expert. and that badge will only work if within the first month of every new release, you've answered all the questions about the new features and the things we've changed. this badge will therefore certify that you are really up to date,

and you really know everything there is to know about the wordpress seo plugin. yoast seo is an extensive plugin that comes with many many features to optimize your wordpress site. in order for you to speed up your comprehension of what's possible with the yoast seo plugin, we visualized every setting that comes with the yoast seo plugin. this course is meant for everybody who wants to use our plugin, and for people who install our plugin professionally for other people. through instructional videos, tons of screencasts and loads of challenging questions, we'll walk you through every step necessary to optimize your wordpress site to its full potential. we talk about why you'd want to set up titles and metas,

and what are some general guidelines around that, what you need to do with xml sitemaps, and how you need to use those.

yoast seo review Mediquip Plus – Perfect WordPress Theme for Medical and Hospital

Kamis, 04 Mei 2017

yoast seo guide

yoast seo guide
yoast seo guide

hey there and thanks for watching wpbeginner.today you'll learn how to install and setup wordpress seo plugin by yoast. aside from great content on your site, youneed to make sure it's properly setup and optimized for search engines. the most comprehensive plugin to handle thisis wordpress seo plugin by yoast. please note that these steps are what wpbeginnerrecommends and other experts might have their own preferences. if you are moving from another seo pluginor theme framwork like genesis, thesis, or headway then you want to install the seo datatransporter to move all your seo data over

before deactivating it. if you have a brand new site, you can skipthat step. after installing and activating the plugin,you'll see this seo link in the admin area, we can go to seo-->dashboard to get started. under general settings they have an introduction tour that you canfollow to get an overview of the plugin. and here you can reset to default with oneclick if you need to start over with the setup. next we have tracking, if you want to send anonymousinfo to them you can check this, we have it unchecked. under security, you can disable the advancedpart of the wordpress seo meta box.

checking it keeps other authors from makingredirects and noindex items on your site. under webmaster toolsthis area lets you add your site to your webmaster tools to some search engines. just add themeta code for each here and click save settings. if you site is already in your tools area,you can ignore this section. next is the titles and meta, for title settings, keep this uncheck as wordpressseo has auto-detected whether is needs to rewrite titles for your pages. sitewide meta settings click use meta keywordstag. under clean up the head check hide shortlinksfor posts and click save changes.

the home tab is where you fill out your titletemplate or what shows at the top tab of your home page.add the meta description about your site here and the meta keywords. the keywords are whatyour site is mainly about and then click save changes. post types lets you choose the default titletemplate that all posts and pages will show, the default meta description and keywords. we recommend you use the wordpress seo metabox on each post and page to manually fill this information out individually and i'llshow you what that looks like in a minute. for these, we can just use title for the templateand that will bring in the post or page title into the url. we'll click save changes here.

next is the taxonomies area you can addthe title template for these as well and as for descriptions, the plugin picks up thedescriptions from categories and tags. we'll leave all default settings and clicksave changes. other are for special pages like author archives,date archives, search and 404. we recommend disabling the author archiveif you are a one blogger site. we'll leave everything else the same and clicksave changes. next area we'll cover is social.with this we can add facebook information. here you add a facebook admin so you can bringthe insights into the dashboard. if you have a facebook page, add the url aswell as the image url and description.

to make it easier, you can also copy home meta. down here is the image url that will be usedif there is no image in the post or page. when you're done click save changes. next is twitter, we can check this to add twitter card meta.this is great if someone retweets your links people can see a summary of your post likethis and you can choose to just show the summary or show the summary with an image. once we add that info, we'll click save changes. for google+ click add google post meta dataand add the url for the google page for your business. you'll also need to go intogoogle settings and add your site's url

in your about section. we'll save changes here. next we want to setup xml sitemaps. this isthe fastest and easiest way to get your site indexed and to notify search engines aboutyour new content. make sure you check this box. for single author sites, check this to disableauthor/user sitemap. the plugin automatically pings google andbing, but you can enable it to ping yahoo and ask.com as well. you can exclude post types from being addedto your sitemap like media attachments. here you can reduce the number of entriesper sitemap page if you run into memory issues.

next are permalinks. this area builds on thepermalink structure. it assumes, you've gone into the settings-->permalinks and changedit from the default link like this to something like this. here you can remove the /category/ from theurl. next is enforce trailing slash, if you endyour posts with .html then you probably want to enforce the trailing slash. next is to remove stop words from the permalink.they are common words like a, an, the and yoast believes you create cleaner urls by doingthis. we leave this unchecked as we disagree with that. the redirect attachment url to parent post allimages have their own url, if you don't want

users to go to these image urls, then checkthis to redirect to the parent post. the next item is good if you have a lot ofcomments on your site as it disables the threaded replies from working for users who have javascriptdisabled, which is the case with most web crawlers. for canonical settings, just leave as defaultand click save changes. next we have internal links. this is the breadcrumpsand trail to the page you are on and is used by the search engines like this: you have domain,blog, tutorials and this is where this article is found. to get this, click enable breadcrumbs,choose a separator, here is the anchor text for the homepage, prefix for the breadcrumbpath. this is prefix for archives and for searchand for the 404 page.

and here you can choose to bold the last pageof the breadcrump. you can also choose to show the taxonomy for thebreadcrumbs. we'll leave none. we'll save changes. the rss feeds section adds content to allyour posts in a feed before and after the post so when a content scraper copies yourcontent, there will be a link back to your site, letting search engines and readers knowwhere the original source is. we'll leave the info here and click save changes. next is import/export. if you used anotherseo plugin, this is where you can import those settings. since we've spent a good amount of time settingall this up, you can also export all the settings

as a backup for other sites or for safe keepingif you mess these settings up. next is bulk title editor. this lets you quicklygo into each post that you had on the site before installing the plugin and update thetitles to a better seo title. once you're finished with them, you can click save all. same thing with the bulk description editor.this lets you give a better description of what each post is about for better seo. the edit files allows you to create a robots.txtfile if you don't have one and it lets you edit your .htaccess file. as a beginner leavethe defaults for your site. extensions are paid upgrades to take yoursite to the next level for seo.

now you want to make sure you are customizingeach post and page as you write them. this really maximizes the benefit of having theplugin installed. for example, i'm creating a new post. you'llsee this new box on every post and page. fill this out on ever post and be as detailed aboutit as you can. give it a focus keyword, seo title, meta description,meta keywords. this is your focus keyword in the article headding page title, page url, content, meta description.try to make all these yes. then look at the page analysis and see ifyou can get all these reds and yellows to green. we'll leave advanced alone for now.

with social you can just keep what the defaultwas from the settings. and when you go to publish you'll also see thisseo area...it will give you a quick red light green light if your seo is good or bad forthe site before you publish. try to get green for every post...in your post writing workflow,make this one of your last things you do after you write your articles to increase your searchengine optimization. i hope you liked this video and found it helpful. if you did, click on the like button below and leave us a comment. and if you want to receive more helpful videos don't forget to subscribe to our channel and check out wpbeginner for more useful information on wordpress.

yoast seo guide Want to Getting Retweet? Read this Infographic

yoast seo google analytics

yoast seo google analytics

a wordpress website without marketing toolswill always be like a warrior without weapons… you’re ready to rock, but you’re missingthe essentials. hi, i am robert from themeisle.com and inthis video, i'll show you seven marketing tools to use on your wordpress site. intro 1. google analytics the one and only! it brings you lots of insights about the peoplethat come to your site and their specific

behaviors. thanks to this tool, you will be able to trackyour audience’s actions on the site and read their minds. i mean, somehow anticipate what they’reup to. to be more specific about what you can findwith google analytics… well, sort of everything. in a word, stats! such as the total number of users in a givenperiod, pageviews, sessions and pages per session, bounce rates, session durations,most popular posts/pages, conversions, etc. knowing your people is a goldmine becauseit takes you closer to your goals.

google analytics is a free tool and can beintegrated with your wordpress site through a simple embed code provided by google. 2. sendinblue for the record, email still rocks when itcomes to marketing. email is one of the most effective marketingstrategies for making people come back to your site. and sendinblue? it has a friendly and easy-to-use dashboard,where you can carefully keep all your email

drafts and user lists. you can also use it to send out your marketingemail, transactional email, and even mobile messages. once you send an email, you get detailed reportsand stats, so you can see what works and what doesn’t right away. open rates, click rates, user engagement data… it’s all there. sendinblue is a paid tool, but it also comeswith a free plan. 3. wordpress seo by yoast

yoast seo is the most popular wordpress pluginwhen it comes to search engine optimization, and it̢۪s completely free. actually, it is one of the most downloadedwordpress plugins ever. it comes with three important settings foreach of your posts and pages: title, meta description, and meta keywords. and not only can you write your custom textand keywords, but the plugin also lets you know how weak or strong the optimization is. under the hood, it also takes care of a numberof optimizations that don̢۪t require your assistance.

4. revive old post this free tool will save you a lot of timeby automatically posting your articles to social media. don̢۪t let your posts only live for a shortperiod of time and then be forgotten. revive old post can be set to auto-share atconstant intervals. you can set lots of things about the shares:the intervals between shares, how old should a post be in order to be shared, how manyposts to share daily, and how many times each one should be shared, what kind of formatthe article should have when posted, and more.

the free version of the plugin can share yourcontent to twitter and facebook. to get additional exposure – linkedin, tumblr,and xing – you’ll need the pro version. 5. pagebuilder by siteorigin yet another free wordpress plugin. this one helps you create great landing pagesin an easy fashion – through drag-and-drop. landing pages can help you make your offermore clear, and thus make it easier for the visitor to decide whether they want any partof it or not. landing pages usually target a specific audienceand focus on a very specific goal.

most commonly, those goals can be sellinga product, a giveaway, email subscription, etc. now, pagebuilder by siteorigin is a free toolfor wordpress that helps you create a landing page. it̢۪s very simple, and you don̢۪t need anytechnical knowledge in order to use it. you can either create an original landingpage from scratch or use a pre-built layout provided by the plugin, which you can thencustomize. 6. ab press optimizer

a/b testing is a great method to improve theperformance of a landing page with. whether it’s visitors we’re talking about,clicks, conversions … a/b testing can help you with whatever goal. and ab press optimizer is a great plugin thatdoes all that. basically, it lets you take two pages andput them against each other. the pro version starts at $49, but there’salso a free version in the wordpress directory. how does it work? well, you add experiments easily by goingthrough a simple settings panel. name your experiment, add a description, thetime period for the test, and set a goal and

the url of the page that you want to test. after a while, the plugin will start informingyou of the results. 7. canva the last one in our video is canva. this is a d-i-y graphic design platform developedwith non-designers in mind. embedded with an intuitive drag-in-drop userinterface along with a massive library of pre-designed templates and free stock photos,canva makes it really easy for anyone to create professional-quality image graphics effectivelyenhancing their visual content.

it caters to a wide range of design typessuch as blog post graphics, presentations, digital flyers, letterheads, advertising graphics,and so much more. you can basically create almost any visualelement you need for personal or professional purposes. the usage of the platform is free and youwill only need to pay when you utilize premium elements. take note that canva has thousands of freedesign elements and images. the tool is available in the following formats:for the web, for ipad, and for iphone. if you have further questions about any ofthe marketing tools in this video i will happy

to answer them in the comments section below.

yoast seo google analytics OdierLite – Simple and Elegant WordPress Theme

yoast image seo

yoast image seo
yoast image seo

this is the post types tab of the yoast seo titles and meta section. on this post types tab, you'll get a section for each seperate post type that you have. so by default that will be posts and pages but if you have more custom post types, you'll see more of them. you'll also see media which are images and other things

you can upload here under media which can have their own page, which is why this is shown here. now, for each post type, you can choose several things. first of all you can determine whether you want that specific post type to be in the index or not. if you can do --if you set it to no index, none of the posts in this post type will be indexable by google. you can set the date in the snippet preview to be either shown or hidden.

now, for posts, this normally should be show because normally you would have a post show--a date-- publication date showing on your posts and you would then want to see that in the snippet preview. you can also determine whether you want to show the yoast seo meta box at all for that specific post type. if you set it to hide here, and you click save

and you go to a new post, you'll see that there's no yoast seo meta box. setting it to show brings the yoast seo meta box back. now, we also have a title template and a meta description template. this works exactly the same way as the title template and message description template for the home page did except that here you might actually want to use a few more variables. now let's go over the variables that are useful.

you can use the date to add the date of your post into the post title. you can, for pages, use the parent title in the page-- in the page's title. you can use the excerpt which in some cases, you might want to use for the meta-description. you can use the tag or the category

to be placed in the title template, so that you can use the category as something that you can show to people straight in the search results. there are things like tag description and meta--term description that in most cases will not really be interesting here yet but they might show up later. now there are a couple of advanced variables that could be very useful depending on how you set up your theme and what kind of data you have, but especially these ones are interesting. if you have a custom field with, for instance, the price of a product

you can use this cf_ and then the-- custom field name of the price field to set the title to the price of a --to have the title contain the price of the product at hand. there are more things you can do here play with it, figure out what works for you. it's really, really worth your while to look at these.

but remember, do not remove the page variable and make sure to use the separator variable and not use dashes in here or something else because that means you can't replace them with your preferred separator. this looks like a lot more but it really means that --that you can change the separator simply by changing the separator on the general tab. also, removing the site name here is something that's --people sometimes seem to want to do

but it's not a smart thing to do. if you remove the site name, google will add it back in and change your titles. so add your site name to your titles on all pages always, and make sure that it actually reflects your site's title as google perceives your site. if you don't

they will do it for you, and whatever you do here in terms of titles is absolutely useless.

yoast image seo OdierLite – Simple and Elegant WordPress Theme

wordpress

wordpress
wordpress

hey guys welcome the wpbeginner andthanks for tuning in. in this video i wanna walk you through how to set upsmall business website in less than an hour using a step-by-step process. so ifyou're ready, let's get started. the first thing we need to do is we need to set upour hosting plan so i'm gonna go to wpbeginner and i wanna go to deals, we'll go tohosting and all the way down we're gonna use hostgator for this. wpbeginner hasa coupon that we're going to use right here. so if you click on this it'll copy that information and it'll open up hostgator for us so we can get started. now from here you just wantto enter all the information and you can if you already have your domain you canclick on that and say you already own it

enter your domain name here. if you don'tyou can register a new site and see if it's available and if it's not it will tell you it's not availablebut then it will come up with some alternatives that you can use and we've already chosen our hosting plan.so now i'm just going to go through, pause the video while i go ahead and set this upand i'll be right back right so now that we have our hostingsetup we need to go ahead and install wordpress. so we'll scroll down and you're looking forsomething called like the quick install we'll click on that and we're looking for thewordpress quick install and we'll go ahead and say install wordpress for us.

pick the site, here they're asking for a littlebit more information and you'll just want to fill that in when you have it all filled out just clickinstall wordpress cancel out of that. okay, now that we have our wordpress installedlet's go ahead and login to the admin portion of our website so i'm gonna go to mysite /wp-admin and you'll want to bookmark this because this is how you can accessthe admin side admin portion of your site anytime you need to. now that we have the hosting setup andwe have wordpress installed its time to get started in setting up our actual theme and our actual site so let's go ahead and get

started. now that you have wordpresssetup i'm gonna take you to the site this is probably what yours will looklike depending on the theme that is there andso what we want to do is find a theme and install that and go ahead and set it up.so in order to do that let's go back to the dashboard and i want to go and showyou under appearance>themes this is the area that drives your themes foryour site. these are the themes that are installedby default yours might be a little bit different depending on when you'reseeing this. i want to go in and find one that is particular to our business. forthe sake of this site i'm going to

concentrate on creating a small businesswebsite and we're going to concentrate on say computer repair. this can work foranything like massage therapist, landscaping, financial planner, any smallbusiness where it's pretty much like you're the only person running yourbusiness and you need to set it up so i'm gonna search for themes, i'm gonna click add new when you add new this brings in all the themes from the wordpress repository these areall the themes that wordpress that they've looked through and verified thatthey're okay to use on your site and you see that they are broken up by a featurethat's the latest ones yours will look different or by popular these are the mostpopular downloads you can also look by

the latest these are the most recentones that have been uploaded. you can also by feature filter if youalready know what kind of color set up you want you can choose that if you know whattype of layout you want or the type of features that you wanna see and what i wantto do is see what they have for small business. it's a little generic but should bring back some decentlooking websites that will be particular for a small business and you can just scroll throughand see which one might look best for your site. i'm gonna look at the details ofthis one so i'm gonna click on that and you'll see what it does is it actually brings it up in thecustomizer window and it gives you a preview of what your theme might looklike.

so this is what mine might look like right now before i make any changes and if we want to close out of that we'll exit there and you can either keeplooking or if that's the one you're happy with you can choose that one i'm going to choose this one so i just installed it and i also activate thetheme. and for that particular theme it looks like there are some extra things thatthey recommend. these are plugins that they want me to install i'm gonna go ahead and sayyes so that you probably won't see that i'll show you how to do plugins later but for now i'llgo ahead and activate these and install them we can go to your dashboard can also justtake a quick peek at our site to see what it did. alright so it looks a little bit different andnow we can go in and customize it. alright

now that i have kind of the basics of mytheme installed you want to start, we want to start customizing it. some of thethings we want to do right now if you don't already have in this go ahead andgather up things like your logo, your information about your business so you wantto write up some stuff we call that content. that will be you know for your aboutpage or your contact us page or where you're located the services that youoffer things like that you want to go ahead and have that if you don't have that whichsome people they don't have that yet they just want to set their site wecan import some dummy data which kind of fills up the site a little bit to giveyou an idea of what it's going to look

like and then you can fill in theinformation as you go along. to get the dummy data on my site for someone to go to my wpbeginner area de dummy data is found i'm gonna scroll down looking for the xml datathat we have as a download here's the file i'm gonna right click and save that, now i'm gonnago back to my site i wanna go under tools > import and i want the wordpress import to be able to import i need to install this little importer. i want to activate and run it i gotta find that file that i just downloaded and i wanna upload file and import. here it's just saying there's an author associated with that who do you want to give it to i'm gonna say me. same with all of these authors we'regonna sign all those authors to me and we want to go ahead and download andimport the file attachments that way we can

also see images of the dummy content submit that. alright now it says that all of that's been done so just to show you what i'm talking about i'll go to my siterefresh the page and now you see all these pages and the menu because they are nowall these new pages instead of just hello world we have all these new postsso it gives the site a little bit more feel, look and feel so you can would look likeas you fill it up with your content. so now that that's done we can move on. i want to show you a couple of great freeor inexpensive things if you don't have a logo but if you want one these are logo generators and the firstone is called the hipster logo generator.

now it just kinda takes you throughstep by step on creating a logo. so you want to spend some time doing that. wesaid we're gonna do a computer repair shop so i'm just gonna do a real quick runthrough on this i'm gonna click that, go next and i'm just playing with this you just want to spendsome time playing with it. do that and click next gonna click, for me i'm gonna click double line, it'll show the text here you can change the font and the location. clicking on these also show you the logo fonts you want to use we'll just do that. great pc repair we'll use that, we'll clicknext

like i said spend some time working onyours and you can add some color here if you want. do some background color like that. this means transparent i'm happy with it and then here you can download it. you can download asmall item if you like it and you want a bigger item that you can, you can go ahead an pay a little bit extra. so i'm gonna add this to my folder that i'm working, that i'm using and we have a logo. so you can use hipster logo if youwant if you already have a logo great if you have somebody else that you'reusing perfect. there's also something else called the squarespace logo if youwant to create a logo there you can use

that one. so now that i have a logo let's goin and continue to customize our site. to customize it we're gonna go under appearance and click customize. each theme will have slightly different area for thisbecause each theme has different settings to worry about so i'm gonna click on the logo and this is name it you see it changes it up here. now everything i'm doing over here you're getting tosee it a preview of it here but you don'tactually it's not actually changing the website until we finish and click saveand publish so you can mess with all this all you want and then when you'refaced with all your setting changes go ahead and click save and publish. we just created thatlogo so we can actually put that up here

the recommended dimensions are 300 by100 on this theme since i have my logo down here i can actually drag that. so i'm gonna do dragand drop and i'm gonna use that as a logo and you say because my theme my logo is fairly largeit's using the whole thing there so you'll want to make sure that it's set at the 300 by 100 orwhatever the dimensions are that your theme is working on. so i'm gonna remove that when i do it'llbring back my pc repair so that's okay. but we can use that site icon andwhat that is is the little thing up here you see it's showing you that's what it wouldbe and now you see that my little icon as that. so i have done all my customizing on that so i'm gonnaclick back and keep going. alright so far the colors you can choose a backgroundcolor right now it's white you can go

any of these colors that you want. content we're gonna we'll keep that as that it's if you notice that changed it to blue so that makes all of my content words and such that color and we don't want that so we're gonna go back and click on default like that color it's easy on the eyes and you may come acrossa theme where it's basically a lite version so if you wanted more colors you would want to update that to pro. so moving along i don't havea background image but you could do a background image on here, say show them that youare a unicorn and that's what it would look like. you can change the tile, repeat it, what have you.

i'm going to remove that and for the menu this theme has all of these menus right here andunder menu location the top navigation and the primary. i'm not sure that those areso we're gonna go ahead and select let's try all pages and see were the top navigation is. yeah, top navigation is way up here what you probably want for that would be maybe social primary navigation is that one, that's probably the we would use for let's try short and see what that looks like. that looks better that's for the menulocation if you don't have any menus just click add menu you or if you wantspecific ones. typical menu would be like this is the menu that we're workingon and it has the home, the blog, about

which also has these submenus so when i hover you see all these submenus and this page. from here you can reorder them by clicking and dragging them or you can also add one and you can eitheradd a post or a page if you have a category like tips on how to fix pcrepair you could add that has a menu item as well. but i'm happy with the short menu so we're going to go with that. clicking back and moving on, the widgets.the widgets are these little areas like over here this sidebar area this is a wholewidget area. so that's probably the primary sidebar for this theme. each theme has itsown widget area and as you can see these are all the items in my widget area. if youdon't like something on the side bar you can

click on the down arrow and remove it, the same thing with categories that just seems really long so i'll remove that. i'm happy with that widget area. for this theme we have these other widget areas a call to action i'm going to add a text field, it's working on adding it and i'll show you where that goes so for this one it's up here so you can change that make that a little bit better looking butbasically that's a great call to action for especially for a small business or alocal businesses who want something like that for me i'm good with the widgets so i'm going to click back off of that. static front page right now we're just pulling in all of our blog posts onthe front page says we're setting up a

small business site i want a static frontpage for that and it'll likely be like for my pc repair maybe i want to showthem all of the services that i offer what have you. this is where we'll want to go in andcreate our actual pages of our services that we offer or our products that we sellfor right now we'll use the front page template and since we have that as ourstatic front page i also want to get the blog that is the blog page that all of myblog posts will show on so when somebody clicks on this it'll go to my blog posts. alright so now we have a static front page which we want for our small business and we have a blog page setup.

those are all the customizations that we can do with the customizer i'm pretty happy with it so i'm gonna click save and publish. when i exit out of that it will take me back to the dashboard area. now when i just got to my site do a quick refresh and show you what it lookslike now and you see for me it's looking pretty good. like i said before we wantto add our own information here we want to add our own posts here but this gives you a goodidea of what everything looks like and for page it's because we are logged in that we see that our visitors won't seethat so that's ok. alright the next thing

we want to work on is installing aplugin that will help with seo. so we're gonna go to plugins add new and we're looking for yoast seo and this is the one we want so we'll install that now and we'll activate it. it comes up with atour notification so you can do that if you want. we're gonna go right into itand do some quick setups this is actually a great reminder if you don't have your website set up to show your post names then this you will see this informationand you actually do want to fix that you can either have them you can have themtake you to fix it or anytime you need to you can also go down into generalsettings and permalinks to fix it yourself right now since it's a brandnew website my site is showing with some

numbers after it and you always want tochange that to something a little bit more detail oriented or easier forsearch engines like a sample post. post name is actually the one i usually use and we'll click save changes now that that's done we can go back into seo general and we'll go from there. there's a lot of information on here but there's just some specific things that you'll want towork on this is the website name that you want to put in, this is usually yourbusiness name and you can show them whether you're a company or a personwe're gonna say company name and then if you had a logo like we talked about you can upload that there.

i'm gonna click save changes. now after you go under general you just want tomake sure that you have titles and metas set up. by default, title separator that'sthis information right here and right now we have a dash some people like to have thepipe or any of these other characters you can choose from. on the home page, thehome page you can just a edit on the page itself or on the blog page itself we'lldo that right now. so i'm gonna click on that link it will take me to the front pagewhich is my homepage and they're just saying to go down all the way down hereand set up this information. this is the snippet so you can change that

here. now you, when you're dealing withlocal search engine you always wanna add your city and state that usually helpsout with these search engines as well. since we made some changes to that i'm gonnaupdate that and just a couple more things that we want to do under social, undersocial>yoast seo you can add all of your facebook, twitter username, all yoururls here and that just kind of helps google know all of the profiles that areassociated with your business so you want to just add all of those in here like that and you want to fill all the others out. you can save changes and you can actually click on this, this is for whenyou post things to facebook sometimes

facebook's images don't come over verywell so you can actually upload a default image for that so you could do thatthere. twitter you can just show how you want it to look either just a summary or with a large image on twitter let's save changes so those are the basic set-ups for yoast seothe power of them comes in the actual creating posts or pages and we'll go intothat right now because the next thing we want to do is go ahead and set up since we are a local business i wanna go ahead and show you how to set up pagesby setting up our services page for our site. this shows you how to do a page and i'll alsoshow you how to handle adding media or adding images to your site with this one. so we're going to add that

i'm gonna go ahead and add my service information here. a lot of it's just placement to show you what i'mtalking about. so this is our service site i also want to add an image so youand to click add media. if you ever want to add images and if you installed the dummy datayou'll see all of these images or we're gonna actually upload a file that isspecific to our services and that just helps with the information. you can either have it on its own with noalignment or if you want to have words coming around it you can click there and you see the words will wrapped around the image. you also see this, this area is now this is actuallycoming from yoast and that's our current

seo score. when you scroll down to thebottom any of your page and any of your post you actually wanna go through here toset up your seo and from here you want to add in the focus keyword that you're lookingfor maybe pc repair in austin texas and then yoast starts giving you a yellow greenor red light and so you wanna fill in all this information that helps increase yourrankings for that keyword. so you see we're getting some green and that's goodwe just need to go ahead and follow along with some of these other things.you see from here they're saying that focus keyword doesn't appear on the title sowe want to change that. and this information pools from your title page up here you can either change it down there or

you can change it up here so let's do that, and once you're finished with doing all of your changes to the page you can go ahead and clickpublish and since this is a new page we need to go ahead and update our menu. goto appearance menus and since there are so many on there i'm actually just going todelete this menu and i'm gonna start fresh. so i'm gonna create a new menu, call it main, create the menu i'm gonna click on all the pages that i wanna have there and i'm gonna do front page because that's actually my homepage. so now they're over here and i can drag them however i want and from here i'm actually going to label this home and now that will be home. i'm actually

going to label this services, this isonly changing what it shows up in my menu. i'll click save menu. now that we created the main menu we also need to update the location of that. so the primary was shortnow we're gonna make the primary main save, and now when i refresh we'll see homeservices and now when we click on the services that's our newly created page and when you click home, that's the homepage. so nowyou have the basics of a small business website set up and you're ready to moveforward in showing off your new website. if you like this video click on the like button and go ahead and leave us a comment there, we'd love to hear from you.

and subscribe to our youtube channel to get the latest videos.

wordpress Premium Freebies for Web Design : Icons Set, UI Design, UI Kit, HTML Form and PS Brushes

wordpress seo tips

wordpress seo tips
wordpress seo tips

hey there christina harris with wpbeginner.com.in this lesson i'll show you how to add your wordpress site to google webmaster tools. if you are interested in growing your readershipof your site and making sure that it's healthy then using google webmaster tools will help. with the tools you can review things likekeywords that your site is coming up for in searches. or how many pages have been indexed by google. you can also see the overall health of the site. so let's walk through how to add yoursite to google webmaster tools. first, you need to make sure you have a googleaccount.

if you do, just go to https://www.google.com/webmasters/tools/and click add site you want to type in the your site's url and click continue. now that you've done that you need to verify ownership. as you can see they have a recommended methodor you can also use various alternate methods to verify your ownership. today we are going to use the recommended methodand add a meta tag to the website. in order to add the meta tag, we need to install a plugincalled insert headers and footers. i'll go to plugins, click add new, searchinsert headers and footers, click search plugins i'm going to make sure i find the right plugin and clickinstall now. say okay.

and now i want to activate the plugin andi need to add the meta tag from the google webmaster tools. i'm going to go over and copy the meta from google, come back to my site, go to settings-->insert headers and footers and paste the meta tag in the header here. now i just need to click save settings. you'll see up here it says settings saved. now i want to go back to google webmasterand click verify. if i've done everything properly i'll get a green check mark and a congratulations message. now i can click continue to see how my siteis doing.

with a brand new site and initally adding it to google webmasters, there won't be much to seeso you'll want to give it a little time for things to show up. i hope you liked this video and found it helpful. if you did, click on the like button below and leave us a comment. and if you want to receive more helpful videos don't forget to subscribe to our channel and check out wpbeginner for more useful information on wordpress.

wordpress seo tips NovaPress – WordPress Theme for Content Viral, Easy to Go Viral

wordpress seo settings

wordpress seo settings

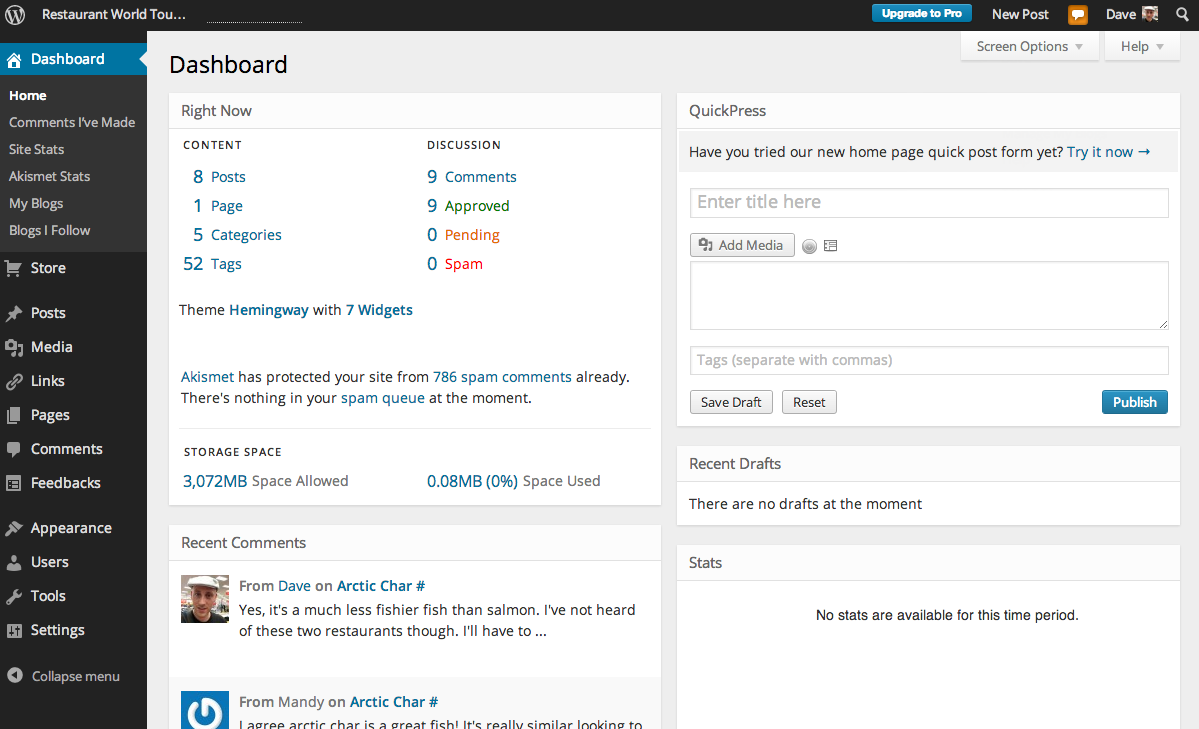
hey there, this is jordan alexo from prositetutorials!where i talk about professional website in 5 steps. in this video, i am going to talkabout one of the most popular plugins for search engine optimization called, yoast!this is really a fantastic plugin that comes with a lot of features. i personally considerif you are starting out this is probably one of the easiest plugins for you to setup. inthis video, i am going to explain in detail how you can do it! so let's get started! thefirst thing that you need to do is simply install the plugin. for you to do that, yougo to your wordpress dashboard. once you are here, you go to the plugins section and youpress add new. you can see that you have this search box. you want to search for yoast.actually, i wrote it wrong. yoast... and it's

this first plugin that appears. you mightwant to click on this link so you can grab more information about this plugin. this isreally a very popular plugin. you have 4.5 rating, which is really good! and 1 millionactive installs, which is really, really a lot! so i am just going to press install now.activate the plugin. you can see that once i activate this plugin, i have a new sectionappearing on my sidebar. i believe they made an update yesterday or today and the iconthat appears on the sidebar now looks different. so i am going to click on it. once you clickon it, you are taken to the general tab. if you want you can just start a tour and basicallywhat this does is... it opens up a window and goes from each section just giving yousome details about the several features that

you can see. but you certainly you won't needthat because once you watched this video, you will have a clear understanding aboutyoast. you can also click on latest changes just to see the updates they made for thisplugin. so you can get more information. and for some reason if later on, you made somechanges, which you don't like much and you want restore to the defaults settings thatyou had initially once you installed this plugin on your website. you can press on thisbutton called restore default settings. then you want to go to your info, you want to putyour website name and also if you have an alternate name for your website, you mightwant to put it over here. this information will later on appear on the search enginesresults page. so i am just going to put prositetutorials!

below you want to either choose if you arean individual behind your website or a company. in this case, it's a person. below you wantto write your name. this information then is actually goes to google knowledge graph.so they gather this information from you then you just press save changes. next tab webmastertools. this is an option that allows you to quickly verify your website with each specifictool that you can see on the listing. so i would recommend for you to at least do forthe first three ones with alexa, bing and google. and yandex which is one of the mostpopular russian search engines, you might also want to do that because it's really quick.i am just going to explain how you can do it with google so you can get a better idea.so you want to click on the link then you

are taken to webmasters central. i alreadydid this for this website. but you want to select html tag. once you do that, you wantto grab this piece of coding that appears on this bar. select this, go to your websiteonce again and paste it over here. once that is done, just press save changes. you cansee that it immediately removes all the unecessary coding that was appearing previously and justgrabs your id. now i want to go once again back to webmasters central, click on thisbutton that says, verify. and it's really that simple! now let's go to security and...for me to explain more in detail this... one of the reasons why this plugin is so goodis because it allows you to basically optimize each page individually that you have in yourwebsite for the search engines. so this is

one of the posts that i have in my websiteand you can see that below, i have this box that belongs to yoast. and this allows tobasically optimize this line, which is the meta title. this is the title that later onwill appear on the search engines results page. and it also allows you to have the descriptionthat you want for your post or page on your website and also the meta title appears onceyou go to your post. once you go to your post, you can see that the meta title appears overhere on the tab. basically, if you have several people using your website, people probablyyou don't trust much! you might want to keep this option checked because this way peoplecannot use the advanced part that belongs to yoast seo meta box, which is this box thati mentioned previously. because if they have

that option appearing they can not index thatpage so that means that it won't be index by google, yahoo, and so on... so it won'tappear later on, on the search engine results page and also they can do funny stuff forexample, redirect that post to another website and so on... so if you have more people usingyour website then just keep this option checked. if you are alone then no problem just keepit un-checked and just press save changes. let's go to titles and metas. first rewritetitles, well... sometimes, some themes cause some problems when it comes to configuringthe meta titles for your website. if you are having problems then you may want to chooseenable force rewrite titles. but this actually something that is auto-detected by yoast seo.in this case, they didn't notice any kind

of problems on my website. so they let itunchecked. titles separators, once again this belongs to the meta titles. so the meta titlesis the line, this line that i... mentioned previously. and you can define the kind ofseparator that you want appearing over there. this is really not very important! i am goingto homepage. this is the template that you want for your homepage. by this i mean thatthese tags will later on be substituted in this case by your site name. so once i goto my homepage, you can quickly see that this line, actually the tags are being substitutedby in this case first is the title, the name for my website. and also the tagline, whichis this line. this is really not something that... that important because the reasonwhy you are using this plugin is because you

want to customize individually each page thatyou have in your website. so what i typically do is... i simply delete everything that youcan see over here. in this case add a dash, and i just write the title that i want formy website. actually, i already have over here this copy, so i am just going to leavethis! once again this is the meta description, this is the description that will appear onthe search engine results page that belongs to google and also other search engines. onceagain, you want to put your keywords, you want to put a good and enticing descriptionfor your website. so... this doesn't really matter. this is just an example. actually, you want more tags,if you want to see more tags, you just click

on the help section. you go to basic variables,and you basically see all the tags that you can use with yoast. so i'm just going to savechanges. you can see that once i refresh my website, you can quickly see that my metatitle actually changed! you cannot see the description but... once, this... my website,this website appears on google or other search engines. the description will appear overthere on the results page. let's go to post types, post types i am just going to leavethe default template. the reason why i am going to do that is because when it comesto posts sometimes you might actually forget to had a customize meta title and also descriptionto your website. so i am just going to leave the template for that. so meta descriptiontemplate, i am actually going to select something

called, excerpt. this line! this tag! i'mjust going to copy and paste it over here. what this does is... it grabs the first linesfrom my posts and uses as a description for my post. below you can see that you have metarobots, not index or follow. you certainly want your posts being found by google andalso indexed on their search engines. so you don't check this option. date in snippet preview,this really depends a lot on the type of website that you have. if you have a website thatyou offer every single day fresh news then you certainly want to add the date on yoursnippet preview. if you have a website that has ever green information then you don'twant this option. yoast seo meta box, well... you certainly want to use this. so you don'twant to add it. i am going to do the same

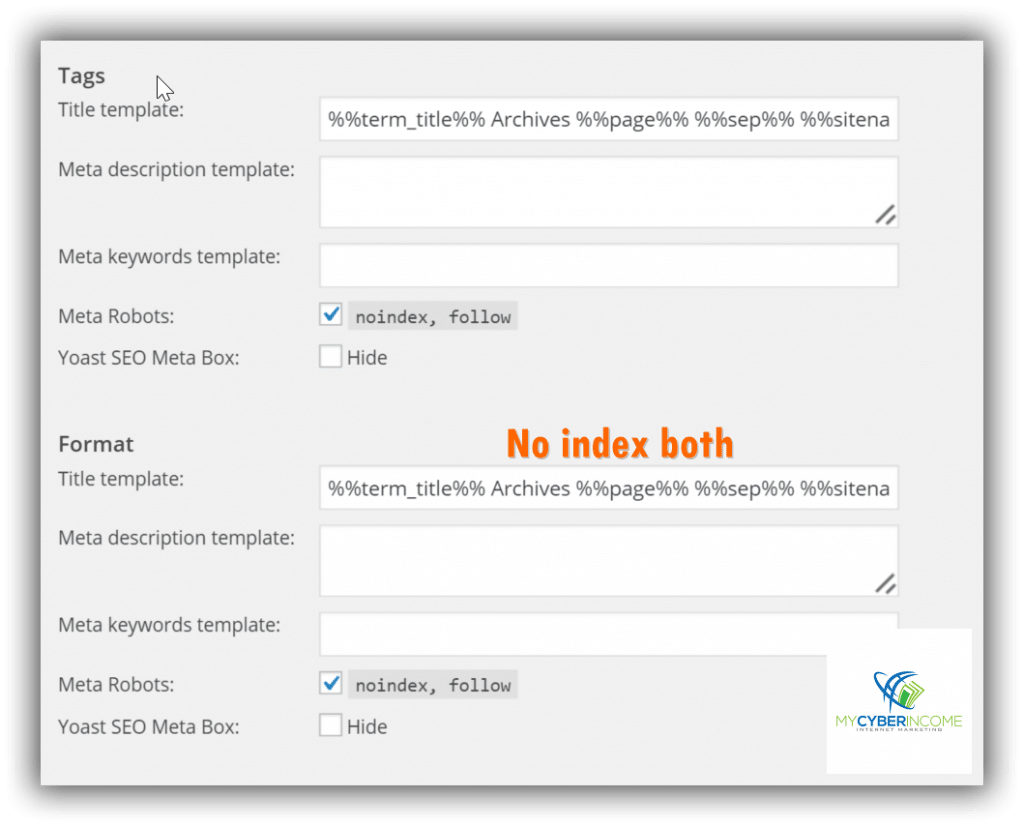
thing for pages and also for media, and justpress save changes. let's go to taxonomies, categories! typically the categories on yourwebsite is just copied content from your posts and if you don't want your website later ongetting penalized by google for having copied content then i strongly recommend for youto not index those categories pages. and also it's quite unnecessary for you to have theseo meta box appearing on your categories. going to leave the same options for tags,andd also format and press save changes. archives! archives basically i go just below and...i'm going to, in this case, i'm not going to index the author archives. because typicallythe author archives just grabs information either from your categories page or from yourhomepage. once again, pretty similar to what

i explained previously. if you don't wantto have problems when it comes to copied content and getting penalized your website by that,then i recommend for you to not index those pages on your website. pretty much that isall that you need to do in this page and just press save changes. now let's go to others,in this option if you want to prevent the second page, so i am going to explain moreexactly what this is... this is my main website, once you have a lot of posts appearing onyour blog, and this is only for your blog, if you have a blog appearing on your website.you can see that below you start having something like the first page, the second page, thirdpage... and you certainly don't want people finding the second page or the third pageon the search engines and going to those pages.

because you want people going to your mainpage, your homepage. so what you do is simply not index those pages! so i am just goingto select this option. and for some reason if you want to use meta keywords, which ispretty useless now in days because no search engines uses that. you might want to checkthis option if you want to use meta keywords on your website. dmoz directory, this is oneof the most famous directories on the internet. if you don't want google using the descriptionfrom those directories for your website then just add this option. add... noodp robotstag sitewide. so they don't use the description appearing on dmoz directory. and the samething for yahoo directory, so it's pretty much the same thing. just press save changes.now let's go to social...

one of the features that i really like a lotis the social aspect that belongs to yoast. once you click on social, you're taken tothe accounts tab. over here, what you want to do is simply grab for each profile thatyou have belonging to your website the url. this informs google that those accounts orthose profiles belong to your website. so you want to do it for facebook, or any ofthe profiles that you have for your website. and facebook, the first thing that you wantto do is simply click on add open graph meta data and below you can see that you have frontpagesettings. this pretty much allows you to craft the information that you want each time someonepublishes the url from your front page of your website. it allows you to add a customizedtitle, also description and also an image

to that url. so i am going to explain howyou can do that you just click on upload image. you pretty much choose the image that youwant to use and that will appear on facebook later on! also a title and also a description.once you do that, you just press save changes. now what happens is... when someone... whensomeone shares your website on facebook. you can see that the image that i selected appears,also the title and also the description. so basically, if you know that the communitythat follow you on facebook is... basically attracted to some kind of titles or descriptionsthat you have then this allows you to pretty much craft that. so you can have somethingthat is really enticing to your facebook community. and default settings this allows you for exampleif you have a post that someone shares on

facebook, which doesn't have an image, thisallows you to add a default image that will appear. so i am going to just select one,it can be this one. if you want to use facebook insights, which allows you to see the behaviorthat people have on facebook, while using your domain name. you can use this, you justneed to press add facebook administrator. click on this link. once you go over here,you add your domain name. in this case, it's prositetutorials... this one and select theprofile, which is prositetutorials. you just grab this id that appears over here. actually,i am having a hard time just copying this, which doesn't allow me. so you grab that id,you go over here, you remove this piece of coding and you just leave this number. andalso add a name to your administrator. just

like this... and press add facebook administrator.you can see that now you have this appearing below and you just press save changes andthere you go! twitter if you want to use twitter cards, this is an option if you want moreinformation about twitter cards. you just go to this page, dev.twitter.com. so... iam actually going to leave the link on the description from this video and you can readmore exactly what are twitter cards. if you want more information about this. and if youwant to use this just check this option, add twitter card meta data. you can either havejust a summary or summary with a large image. and this makes your tweet basically have moreinformation about your website and also a nice looking image and so on... each timethat someone tweets your website on twitter.

just press save changes. and pinterest verification,this allows you to verify your website with pinterest, so you just click on this link.basically, follow the next steps that you can see over here and this allows you to verifyyour pinterest account. and... if you want to add google plus specific post meta data.just select this option and also don't forget get the url that belongs to your profile fromgoogle plus. it should look something like this! this url that you have over here butin your case it would be the one that belongs to your profile then just press save changes.that's all about social! then you have xml sitemaps... xml sitemaps is not somethingfor the people that actually go to your website, it's only for the search engine crawlers.this helps the crawlers to quickly see the

posts that you have in your website, the newcontent have to your website and so on... so you want to check this box if you stilldon't have it, so you can start using this option. and entries for page, one thousandentries is pretty much all that you need! once you click on this button, you can seethat it still doesn't appear. actually, i never to... go to general and... press againand let's see... now it does appear. so you can see that... this is the sitemap once youclick on this link, you can see the posts that i have on my website and this is justa test website so i don't have many links. so if you don't have a sitemap appearing justpress disable author and user sitemap. then you can go to post types and pretty much choose...if you want to exclude the posts from appearing

on your xml sitemaps, you certainly don'twant to do that, or pages! in this case, i am just going to leave the standard optionchecked, which is media. if you want to exclude for example a specific post on your website,you just need to grab the id belonging to that post. and if you want to exclude categories,tags, or format, post format appearing on your xml sitemap. you can do it by checkingone these options. but i am just going to leave the default settings. now on advanced...when it comes to the advanced options of yoast, if you are a new user there is really notmuch that i recommend for you to use over here! anyway, i am just going to give youa brief explanation so you can get a better idea! breadcrumbs allows you to add some extranavigation links to your website pages. this

is good especially, when you have a websitewith a complicated hierarchy with several sub-pages and so on... this allows your visitorsto more easily navigate throughout your website. however, the problem is this typically doesn'tcome with your wordpress theme and you actually need to insert the coding into your website.so for you to use this, you need to check this option, enable breadcrumbs. you go below,where you see this link you click on it! now you are taken to this next page, which i recommendfor you to first read it so you can get all of the details. basically, what you need todo is just copy this coding and just paste it one of the three files that they mentionbelow! you can either paste it on the single.php file, page.php file, or header.php so it reallydepends on where you want to place the breadcrumbs.

you need to choose one these files. so yougrab this coding, you go back to your website, you go to appearance and you choose editor,and you choose the file that you want to paste the coding. anyway, i am not going to usethis! let's go to permalinks. when it comes to permalinks there is really not much thati suggest over here for you to use. actually, some of the options might not, really workwell on your website, and it may have some results that you don't want. anyway, the firstoption strip the category, basically it allows you... you can see that once i go to... thecategory page from my website. this allows me to remove this category extension fromappearing on my url. so you want... if you want to remove that just click on this option.and what i recommend also is to clean up the

head section of the coding of your website.because this allows the robots more easily crawl your website pages. this allows youto remove the unnecessary coding that you have on your website. so i recommend for youto check the first three options. but if you have a rss feed on your website, you shouldn'tchoose the last option. but if you don't have it then you can choose it and... just presssave changes. rss... well this is one of the options that is really good because thereare websites on the internet that basically scrap the posts that you have on your rssfeed and then they paste it on their own website. this allows you to... for example, this allowsyou to add a link to that scrap information back to your website. also, you have severaltags that you can use below. anyway, the one

that comes as standard, this option is prettygood! so i am not going to do anything over here. then you have tools, bulk editor...allows you to basically, edit the seo titles on your website in bulk. then you have intools also file editor, this allows you to create a robot txt file. this is a file thatbasically allows you to tell crawlers or robots that crawl your website, which are the pagesthat you want them to crawl. this is really not something that is really important ifyou are starting out! then you have .hatacess file... this is a file that allows you toredirect pages, allows you to tweak the security of your website and so on... import and export.basically, you go to import from other seo plugins, if you are for example using allin one seo, this allows you to import all

the seo information from that plugin backto yoast. then the other option, which you have! this is actually something that is basedon the seo information that you later on have in your website. then search console, thisallows you to... for you to connect yoast seo to google search console, or google webmaster.for that you just click on this button. you press allow, you grab this key or id. youcopy it, and you paste it over here, press authenticate and then you basically choosethe profile that you want to use and you press save profile. then you have extensions! extensions,it allows you for example if you choose to use videos seo, it allows you to more easilyoptimize the videos on your website. if you have news on your website, and you want itlater on appearing on google news. this allows

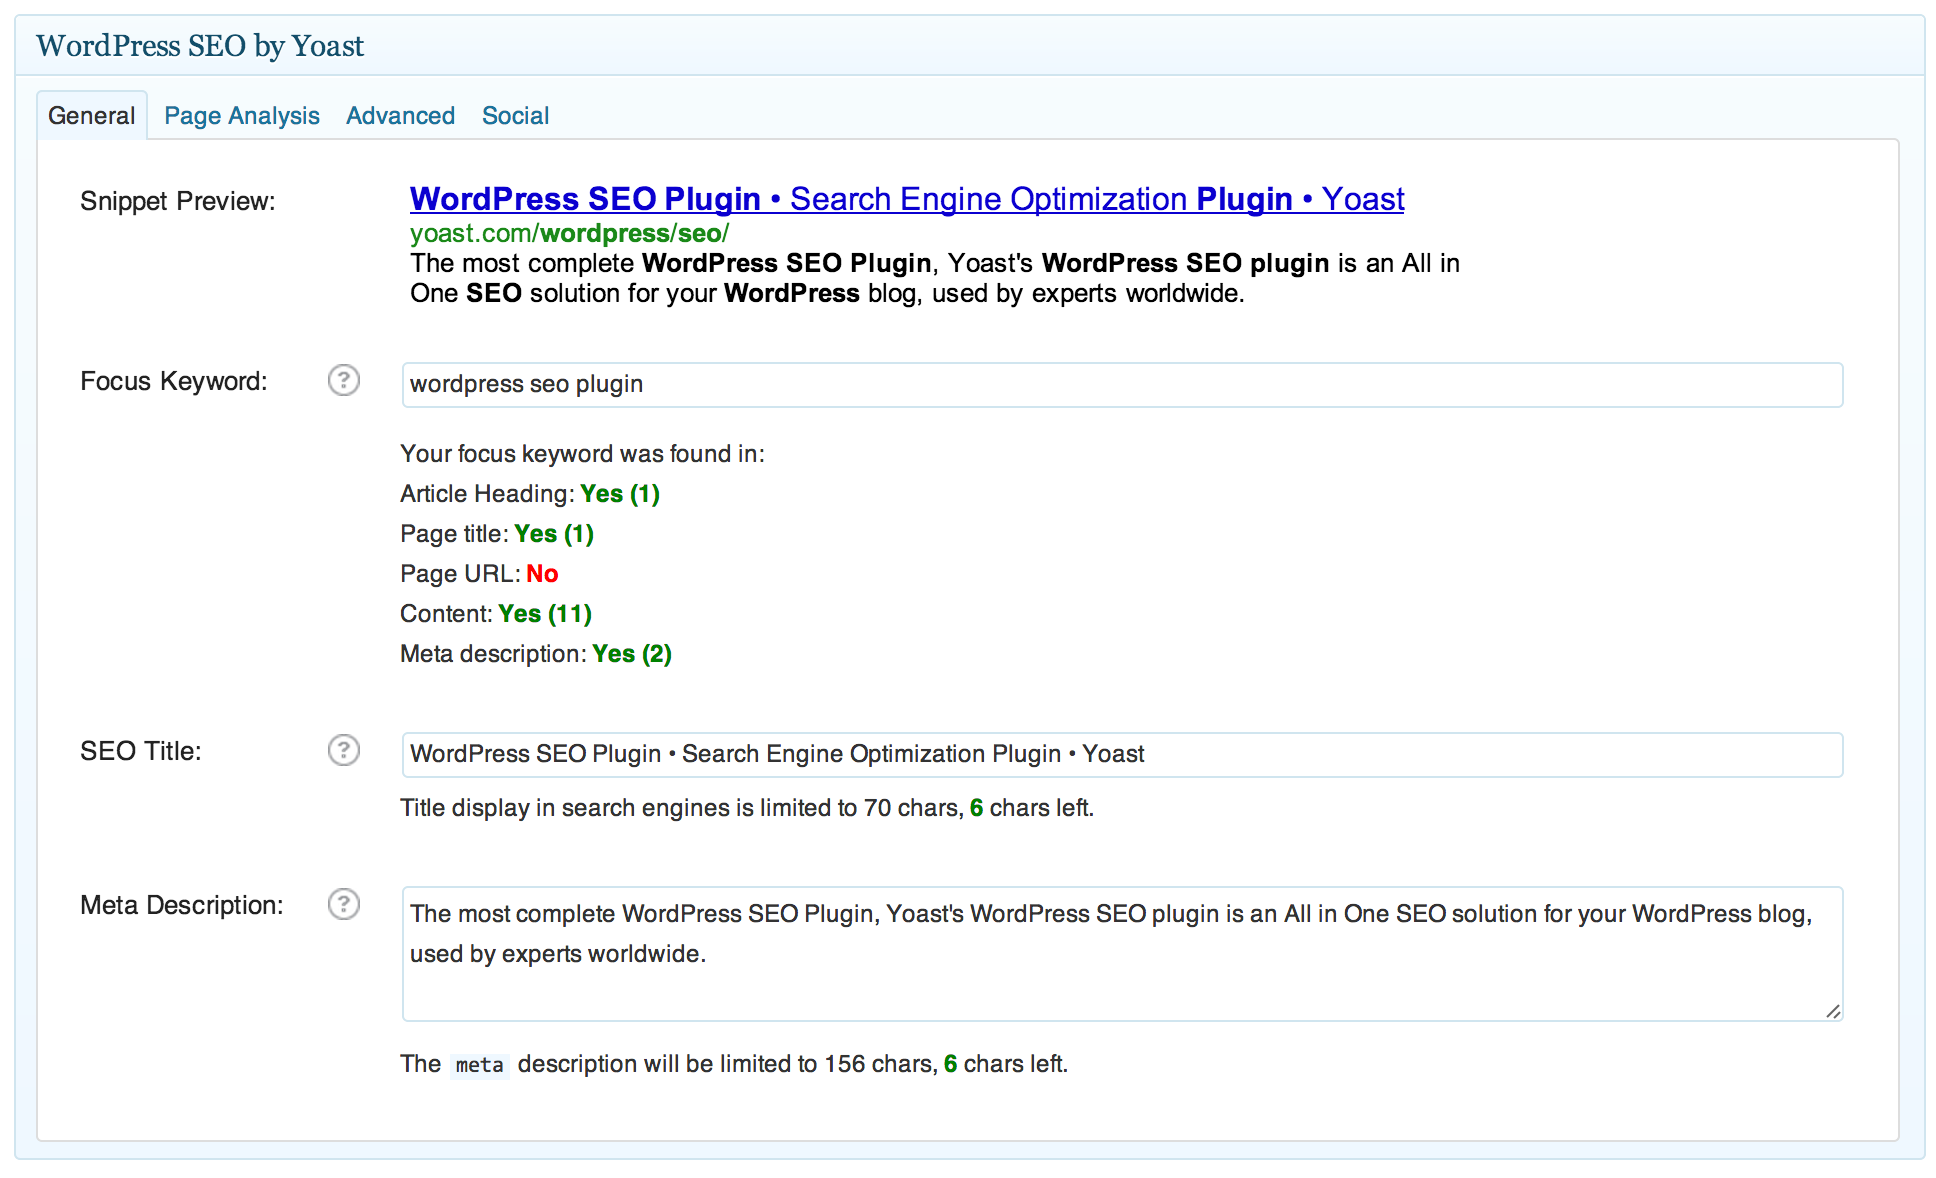
you to optimize for that! then you have localseo, if you want to optimize your website for the local searches then you can use thisextension. then let's go to posts now, so we can talk about the last option! now oneof the most important features of yoast is really this one, which is the seo box in eachindividual page that you have. and this allows you to further optimize your website pagesso it can more easily appear on the search engines. you can see below that you have yoastseo, which i already show to you previously. but this allows you to basically add the titlethat you want later on appearing on the search engines and also a description that you wantappearing. but the first thing that i recommend for you to choose is a focus keyword. basically,this is the keyword, which you want to base

this article around. so, just choose one,let's say... what is search engine optimization. and you can see that below, you have somethingcalled, content analysis. this allows you to see where your post is actually failing,which are the parts that you actually need to further optimize. however, i want to tellyou that you shouldn't really obsess in trying to get all of... every single dot over heregreen because you certainly don't want to over optimize your website pages, or it mightresult in you having actually worse results on the search engines. but try your best toget most green dots but really don't be obsessed with this. it's more important for you toactually have good content that people really enjoy reading. instead of trying to get everythingexactly optimize for the machines. so once

you do this, you want to first optimize yourmeta title with the keyword that you want to rank for. so has i.... actually, i am justgoing to leave this one, what is search engine optimization. and below i am actually goingto change the description. so... this is just an example and basically, what you want to do is always add on the metatitle the keyword which you want to rank on the search engines. and you can also add iton the description of your post or page. so you simply select this, and you can see thatit allows you to basically change this information. now let's go below to advanced. meta robotsindex, this allows you to either index this page. this means that it will later on indexedby the search engine and appear on their results. or, you cannot index it. you can for examplenot index it if it is for example a sales

page, where you are promoting a product andyou don't want for example appearing on the results belonging to google, or yahoo andso on... so you can choose no index for that. then you have meta robots follow. usually,i leave follow but you might want to use no follow for... for example you have severalaffiliate links on that page and those are links usually not very... that google usuallydoesn't consider them good and you might want to choose no follow. this means that oncethe robots crawl that page, they won't follow that link, neither will they pass link juicefrom your website to those websites. then canonical, for example if you have... thispage that you are using is copied content from another one, you might want to put theurl where you got that information. this allows

you ... this allows you basically to not getpenalized by google for having copied content within your website or even in another websites.and the last option, which is really, really good! it allows you to optimize your postfor facebook, twitter and also google plus. basically, once someone shares the link belongingto this post, you can choose the title that will appear on their facebook, and also thedescription and also the image. basically, the same thing for twitter and also googleplus. so that is all about yoast, and how you can configure this plugin, which is really,really good! so that is all for this video, i hope you enjoyed! please subscribe so youcan receive my weekly video updates, where i talk about wordpress, seo, how to make moneyonline and much more! so stay there, stay

tune with prositetutorials! bye...

wordpress seo settings

wordpress seo premium

wordpress seo premium

our selection of premium tools include someof the best internet marketing tools in the business. our membersarea page, you will find some of the tools that can be used tohelp increase your online presence, get more sales and acquire accuratepicture of what needs to be improved. use our tools and improveyour business today! you can visit our site toget a glimpse of our internet marketing tools available for you. we have over 600 udemy courses and still growingpremium themes seo toolswordpress plug ins and much much more!

get you chance to get it all with our onetime payment option at www.toolsofinternetmarketing.com

wordpress seo premium Mediquip Plus – Perfect WordPress Theme for Medical and Hospital

wordpress seo plugins

wordpress seo plugins

- [john] hello, this is john peterson with develare, and todaywe're going to cover the yoast seo plugin, and in particular, the meta-descriptionfunctionality, and also the excerpt functionalitythat's built into wordpress. now, today we'll be testingagainst version 3.34 of the yoast seo plugin,and we're also running version 4.5.3 of wordpress. now, we're gonna jump straightover to the blog here,

and we've got a couple of blog posts. the first is "who can say no to pizza?" the second, "we're delivering to oklahoma" we can see that both theseblog posts are uniform in size. we've got a little ... at the end there, and that ... shows us this isthe auto-generated blog post has been cut-off, or the excerpt, or the auto-generatedexcerpt, i should say, has been cut off, and if wewanted to read the full page,

we would click thecontinue reading button. now, let's go ahead andjump into the post for "who can say no to pizza?" we've got a blank meta-description here. we've got a blank excerpt. now if i fill in theexcerpt field, hit update, and then reload my blog page, the excerpt is now short enough to wherewe don't need the ellipsis, or ... at the end.

and, everything looks great here. now if we go to yoast. check out the meta-descriptionplugin, well looks like things are a bit too long. well, search engines, andgoogle in particular, want a much shorter meta-description. in particular, google likesto see meta-descriptions around 156 characters, or something that's a maximum width of 933 pixels.

now, if i go in and try topaste the same meta-description that we used from the sameexcerpt that we used before, into the meta-description,we can see it's too long. so what do we have to do? well, we have to cut some content. now, we can cut really anything. this is really just a demo. and so let's go aheadand cut off the end here. close snippet editor, and then we have

a custom snippet, or acustom meta-description for google and other search engines. we've also got an excerpt thatwill work for our blog pages. so whether you're usingexcerpt or meta-descriptions, that's up to you. my recommendation wouldbe to use a separate meta-description that'scrafted for search engines and use an excerpt that'scrafted for your blog. hope you enjoyed the video.

if you did, please click athumbs-up, and i thank you for your time.

wordpress seo plugins Transfer File Server to Server with FTP Program. You Don’t Need to Download First

wordpress seo plugin reviews

wordpress seo plugin reviews

how to customize wordpress 2017 theme hello welcome to my channel my name is amulya and this is taptube in this video i'm going to talk about the new features that you get with wordpress 4.7 and 2017 theme so this is wordpress 4.7 von which was recently launched and it's presenting 2017 theme because the 2017 has come so what do you get with 2017

theme and wordpress 4.7 this is what you get this is 2017 theme it looks on the desktop and this is how it looks on the mobile okay and what do you get so this is what you get you can you get four sections on the homepage you can also upload a video on your header and these are the direction of 2017 fame okay there few so this is the video header

that i was talking about second thing is edit shortcuts that you get edit short curls so when you click on the shortcut it directly takes you to the area where you have to do the editing ok so any shortcut is there smooth menu building you would realize that custom css a good thing pdf thumbnail preview and here you can choose your preferred language for

your dashboard ok so 4.7 the wordpress 4.7 comes with rest api endpoints for posts comments terms users medium settings so this is the best part of 4.7 and h it is going to make it more customizable and so this is going to be good for the developers work for developers and it's good for if you want to connect with other applique

build with any language so this is the best part of work with 4.7 and wordpress 2017 theme it's just awesome star and so now i'm going to take you to our website which is running on four point seven and wordpress 2017 so this is the website i just uploaded this video which is just 2 mb and it's very small light video which is running very fast ok so this is the

home page for 2017 this this this is how it may look like and this is the menu which is a flat yet very dashing i don't know what you call it and then you get a error if you click on here this goes on top and then you get the future image for the first section so on home page you get four sections ok for each section you can promote any of your

pages and make sure that every page has that feature image if you do not have that feature image this will not appear here on on the scrolling down when you're going to scroll down ok so you get the second image then this second featured page then you go to the third image third left featured image and the featured basically featured page okay in

each section and then you get here on the bottom you get the head i'm sorry good idea this is a very simple footer you get nothing but these two and i just added these custom menu and the widget from through the jet lag okay so this is what a good it's a very simple design if you look at here i would suggest you do some customization make it better

as for whatever they seen the concept the website concept or theme could be for your website so make some changes all right so this is it now let me quickly go ahead and show you how does it look like on a blog page okay so this is how it's going to look like on a particular page so this is my blog for this website it has two columns this is

the main content area then the other one is typed the assign bar and you get what do you get here you get on the bottom to the buttons the buttons right you get the buttons here next and previous if you go on a different page let's see i want to go on here under you get a similar thing with the image goes on top so here this is how it looks like you

get the category and our everything here next and previous everything same ok now i'm going to show you how you can make some customization to your wordpress 2017 three ok so we are actually going to customize the work with steam now ok so we are in the dashboard area or admin area here you simply go into appearance go on to customize you can make changes

whatever changes you want here as well you can create header that takes you to the same area ok menu this is created over here so i've just a few menus here i will definitely show you so these are the menu that i have three menus bottom main and social widget if you want to see the widget okay so these are this is a sidebar and

the header footer 1 i've got custom menu 32 i've got categories ok this is it you can simply drag anything that you want to wherever sidebar footer to footer one wherever you want is simply if you want to put sidebar here a calendar on the bottom you can definitely do sir ok so that's it custom menu whatever you want to create you can do so all right now

i'll go to the customized area here i will talk about few changes that you can make on your website okay so everything is the same site title you can put your site title tag line display if you want to display take the check box site icon yeah five 512 into 512 make sure that it's okay you can also put a logo so logo will appear here you make sure

that's 215 to 250 pixels not more than 32 mb but make sure it's light ok so that's dump site identity at the the logo will appear oh just about this so this is a shortcut if you click on here yes that goes here and that goes here so whatever you are are you wherever whenever you see that shortcut if you click on that that takes you to the

actual position where you can make some customization ok area so if i click here this takes me to ok let me just click it ok i did not work out in a way ok it's working sitemap because this is a widget with your thing ok it did here further to this is footer one make sure working ok no problem so this is working all right this is this is a main menu social

menu read by category footed to footer one doesn't work ok no problem ok so we are going to talk about the colors so you get to three options in 2017 theme like others so light will be light the white one everything is light light point second one is a dar this totally changes everything right this is the dark dark one dark theme you also get a

custom one so you can customize it you can choose two colors so background will be the white ok however you want to change these buttons you simply change the color and you see that changes here on the top ok so i'll keep it as it is slightly daughter this is for the title header text color this is for this site title if you see here if you make any

changes over here that changes ok so this is that i'll say that i like this color ok i'll go back the header media that's the change in 2017 so whatever you upload video or image that has to be 2,000 into 1200 pixels and make sure the size is the smaller the better so to change or upload a new video is simply click here you will get upload with your

first and then if you have already approved you will get to change it ok that has to be maximum 32mb and also that has to be in mp4 format only ok click on you select the video and you are done this is how you can upload image from here bottom ok so this is it if you have to upload a video that's really good

menu menu thing we have already covered it's very simple like the old one the only change into new 17 you will see the social menu on the bottom the widget is definitely the same thing any pages obviously the same thing you can choose two pages one for the front page whatever page you want the second the post page i definitely want the blog

page of my website to be a post page theme options this is the new thing that you get with 2017 theme you get four sections i was talking about section one content section to content front page you see front page section 3 content and for so you can choose four pages that you want to promote on your front page also you can put two columns if you want

but i would like to keep it in just one column so what it is going to look like in two column this well you know go to the right and the the site the page name will appear here ok but i would like to keep it as this one the first one column ok one column page and then you can choose the pages make sure every page that you're going to choose for each

section has a feature image otherwise they image will not appear here ok that's it that's it for front page layout ok ok the last thing comes here at each additional css so any css change you want to make on the same theme you do not want to make any child theme you can definitely do so so that will be covered in the next video just to give

you an idea basically how you can change something just select the elements let's say you want to change this background for this footer so i'll this is the chrome browser i'll right click on here and click on inspect so this is the footer right the rap for the footer this is already selected if you make any changes

over years that will be the change the background i want to choose whatever one okay this is how you can make changes that the change you want and once that done you simply copy it this one copy and make sure you address the same class or id so simply i'm not sure what was that okay so it was this one i'll better use this one okay just double click on

it copy it put it here okay and then you go here make sure you put it the background color to shave our do blah this is what it's going to look like hey this is all i can make changes to and then save it whatever changes you want to make and save it and you are done okay so this was an idea this is how you can make some css additional css

customization to your wordpress 2017 theme thank you so much for watching this video please like share and subscribe by the way if you like anything in this video please leave in the comment thank you so much again have a good day gets better

wordpress seo plugin reviews 12 Damn Cool Free Fonts for Designers

wordpress seo basics

wordpress seo basics

so one of the on-page seo criterias is toset up your title and url web address and i'm going to show you how to customize allthat in this video. okay so now that you've gotten a quick introduction on what on-pageoptimization is let's show you how to do it. one of the first things that you do on yourwordpress blog is to set your title and your web address so that way google can find iteasily. i'm going to go the google search to really explain to you why this is significant.so my keyword that i'm targeting is "podcasting a to z" if you see right here this keyword"podcasting a to z" is in my web address and if you also notice google kind of slightlybolds this word in comparison to the other texts and it's also slightly bolded righthere as well and what that is telling you

is google says "a-ha! you're looking for podcastinga to z, i have an article that is about podcasting a to z" because obviously it's in the titleand its in the web address. so obviously this is an article about that subject. so, hereis how you set this all up so it shows up just like this. if you go inside your wordpressand you're writing a blog post or blog page the very first thing you can do is you cancreate a title. if you notice my title is strategically named "podcasting a to z reviewan insider's perspective from a recent graduate". the web address is also named exactly thesame, you can't tell right here but it says 'podcasting a to z' but in the event thatyour web address or your url is not correctly set you can always click this edit buttonand then change it. if it's not already here

you basically type it in and as you can seei typed in 'podcasting a to z'. here's another trick that i am going to show you. i don'thave to set this web address, it automatically generates it for me. how i did that was basicallyi went to my 'settings' and you're going to go to 'permalinks' and you'll want to makesure you click on this button called 'custom structure'. the reason so is you create thisit automatically generates that your web address is going to be an extension of your post name.in order to set this if not set already you would just do '/%postname%' or you basicallyset it right here, click on this tab and call it 'post name'. wordpress has already setthis up for you to do so. so either one of these structures is going to basically autogenerate your web address to your exact blog

post so make sure you do that otherwise itsgoing to generate something like this where the 'default' is '?p=123' google doesn't knowwhat that means so you want to make sure you set it up just like this and click save changes.okay so now that i've explained to you how to set up your title and your web addressin the next video i'm going to show you how to structure your blog post and place yourkeywords for more on-page optimization.

wordpress seo basics Transfer File Server to Server with FTP Program. You Don’t Need to Download First