yoast wordpress seo
hey there and thanks for watching wpbeginner.today you'll learn how to install and setup wordpress seo plugin by yoast. aside from great content on your site, youneed to make sure it's properly setup and optimized for search engines. the most comprehensive plugin to handle thisis wordpress seo plugin by yoast. please note that these steps are what wpbeginnerrecommends and other experts might have their own preferences. if you are moving from another seo pluginor theme framwork like genesis, thesis, or headway then you want to install the seo datatransporter to move all your seo data over
before deactivating it. if you have a brand new site, you can skipthat step. after installing and activating the plugin,you'll see this seo link in the admin area, we can go to seo-->dashboard to get started. under general settings they have an introduction tour that you canfollow to get an overview of the plugin. and here you can reset to default with oneclick if you need to start over with the setup. next we have tracking, if you want to send anonymousinfo to them you can check this, we have it unchecked. under security, you can disable the advancedpart of the wordpress seo meta box.
checking it keeps other authors from makingredirects and noindex items on your site. under webmaster toolsthis area lets you add your site to your webmaster tools to some search engines. just add themeta code for each here and click save settings. if you site is already in your tools area,you can ignore this section. next is the titles and meta, for title settings, keep this uncheck as wordpressseo has auto-detected whether is needs to rewrite titles for your pages. sitewide meta settings click use meta keywordstag. under clean up the head check hide shortlinksfor posts and click save changes.
the home tab is where you fill out your titletemplate or what shows at the top tab of your home page.add the meta description about your site here and the meta keywords. the keywords are whatyour site is mainly about and then click save changes. post types lets you choose the default titletemplate that all posts and pages will show, the default meta description and keywords. we recommend you use the wordpress seo metabox on each post and page to manually fill this information out individually and i'llshow you what that looks like in a minute. for these, we can just use title for the templateand that will bring in the post or page title into the url. we'll click save changes here.
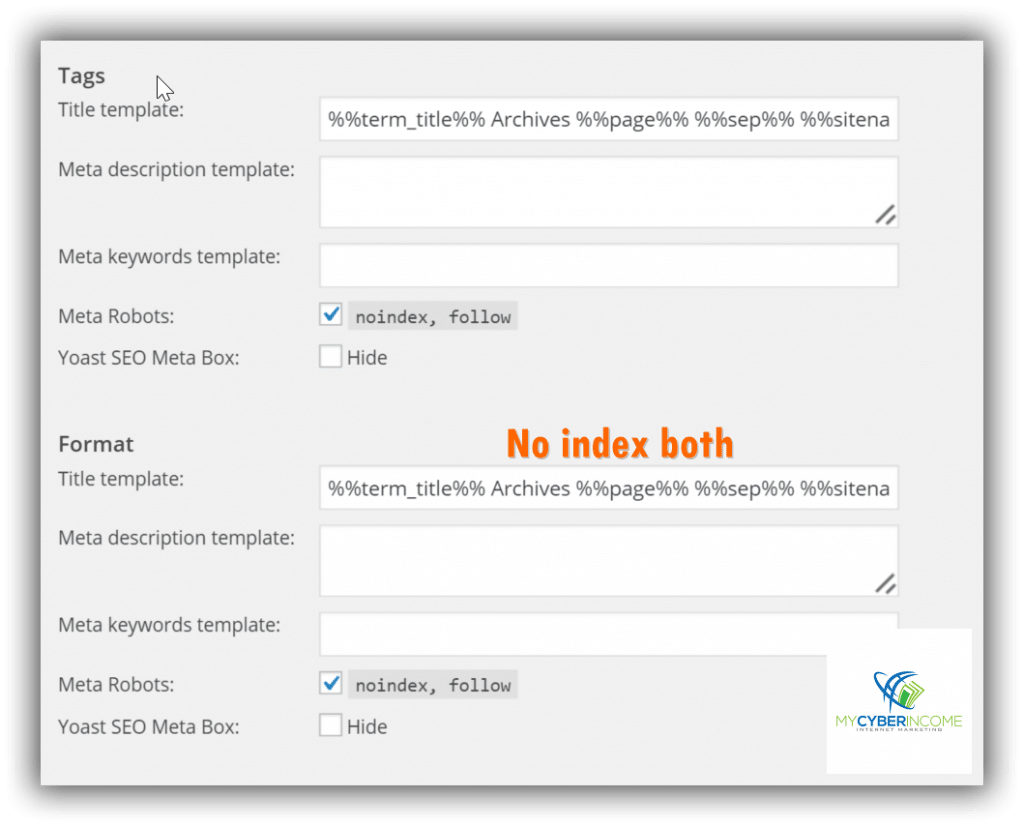
next is the taxonomies area you can addthe title template for these as well and as for descriptions, the plugin picks up thedescriptions from categories and tags. we'll leave all default settings and clicksave changes. other are for special pages like author archives,date archives, search and 404. we recommend disabling the author archiveif you are a one blogger site. we'll leave everything else the same and clicksave changes. next area we'll cover is social.with this we can add facebook information. here you add a facebook admin so you can bringthe insights into the dashboard. if you have a facebook page, add the url aswell as the image url and description.
to make it easier, you can also copy home meta. down here is the image url that will be usedif there is no image in the post or page. when you're done click save changes. next is twitter, we can check this to add twitter card meta.this is great if someone retweets your links people can see a summary of your post likethis and you can choose to just show the summary or show the summary with an image. once we add that info, we'll click save changes. for google+ click add google post meta dataand add the url for the google page for your business. you'll also need to go intogoogle settings and add your site's url
in your about section. we'll save changes here. next we want to setup xml sitemaps. this isthe fastest and easiest way to get your site indexed and to notify search engines aboutyour new content. make sure you check this box. for single author sites, check this to disableauthor/user sitemap. the plugin automatically pings google andbing, but you can enable it to ping yahoo and ask.com as well. you can exclude post types from being addedto your sitemap like media attachments. here you can reduce the number of entriesper sitemap page if you run into memory issues.
next are permalinks. this area builds on thepermalink structure. it assumes, you've gone into the settings-->permalinks and changedit from the default link like this to something like this. here you can remove the /category/ from theurl. next is enforce trailing slash, if you endyour posts with .html then you probably want to enforce the trailing slash. next is to remove stop words from the permalink.they are common words like a, an, the and yoast believes you create cleaner urls by doingthis. we leave this unchecked as we disagree with that. the redirect attachment url to parent post allimages have their own url, if you don't want
users to go to these image urls, then checkthis to redirect to the parent post. the next item is good if you have a lot ofcomments on your site as it disables the threaded replies from working for users who have javascriptdisabled, which is the case with most web crawlers. for canonical settings, just leave as defaultand click save changes. next we have internal links. this is the breadcrumpsand trail to the page you are on and is used by the search engines like this: you have domain,blog, tutorials and this is where this article is found. to get this, click enable breadcrumbs,choose a separator, here is the anchor text for the homepage, prefix for the breadcrumbpath. this is prefix for archives and for searchand for the 404 page.
and here you can choose to bold the last pageof the breadcrump. you can also choose to show the taxonomy for thebreadcrumbs. we'll leave none. we'll save changes. the rss feeds section adds content to allyour posts in a feed before and after the post so when a content scraper copies yourcontent, there will be a link back to your site, letting search engines and readers knowwhere the original source is. we'll leave the info here and click save changes. next is import/export. if you used anotherseo plugin, this is where you can import those settings. since we've spent a good amount of time settingall this up, you can also export all the settings
as a backup for other sites or for safe keepingif you mess these settings up. next is bulk title editor. this lets you quicklygo into each post that you had on the site before installing the plugin and update thetitles to a better seo title. once you're finished with them, you can click save all. same thing with the bulk description editor.this lets you give a better description of what each post is about for better seo. the edit files allows you to create a robots.txtfile if you don't have one and it lets you edit your .htaccess file. as a beginner leavethe defaults for your site. extensions are paid upgrades to take yoursite to the next level for seo.
now you want to make sure you are customizingeach post and page as you write them. this really maximizes the benefit of having theplugin installed. for example, i'm creating a new post. you'llsee this new box on every post and page. fill this out on ever post and be as detailed aboutit as you can. give it a focus keyword, seo title, meta description,meta keywords. this is your focus keyword in the article headding page title, page url, content, meta description.try to make all these yes. then look at the page analysis and see ifyou can get all these reds and yellows to green. we'll leave advanced alone for now.
with social you can just keep what the defaultwas from the settings. and when you go to publish you'll also see thisseo area...it will give you a quick red light green light if your seo is good or bad forthe site before you publish. try to get green for every post...in your post writing workflow,make this one of your last things you do after you write your articles to increase your searchengine optimization. i hope you liked this video and found it helpful. if you did, click on the like button below and leave us a comment. and if you want to receive more helpful videos don't forget to subscribe to our channel and check out wpbeginner for more useful information on wordpress.